Sunday, November 29, 2009

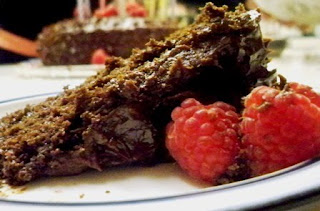
Happy B-Day Big Sis (double chocolate-raspberry cake)


So this blog post goes out to my big sister, LB, for her big double digit 2-0 birthday. (Happy birthday big sis!) Somehow she manages to still get I.D'd when entering theaters, and still receives adorable little plush bears wearing Ralph Lauren bow ties. However, the time has arrived where it has become harder to squeeze so many birthday candles onto such a delicate and dainty chocolate cake without worry of wax and fire colliding together to melt the cake away.

As long hours and patience went into the cake, all was worth it when LB's face lit up from the final product. (Or was it more lit up from the many candles that had bombarded the chocolate?) Friends and family were delighted over this classic birthday cake, for it was simple yet elegant with the pleasurable Ghirardelli chocolate and rich raspberries which added a sweetly tart taste to top the cake off. I originally had made a raspberry filling, (which might i add took at least a good 25 minutes to "simply" squeeze all the juices out of the fresh raspberries) but I was not satisfied with the taste and did not want to ruin the cake so I forced myself to throw the filling away. (Tear.)With or without a filling, this classic chocolate cake will beat any body's chocolate cake any day! It is simple, yet oh so delicious with decadent flavors in every bite!

Ingredients:
1 package fresh raspberries
2 oz. semisweet chocolate (I used Ghirardelli.. as always!)
3/4 hot coffee (you will not taste the coffee in the cake, it just brings out the richness from the chocolate)
1.25 cups of sugar
1.25 cups of flour
3/4 cup cocoa powder
1.5 teaspoon baking powder
1 teaspoon baking soda
1/2 teaspoon salt
2 regular sized eggs
3/8 cup vegetable oil (I know this is an odd measurement, but trust me when I say it works the best)
.75 cups buttermilk
2 teaspoons pure and all natural vanilla
Frosting:
8 ounces semisweet chocolate
1/2 heavy whipping cream
2 tablespoons of sugar
1 tablespoon of syrup
1/5 cup unsalted butter
LETS COOK!
preheat the oven to about 280 to 300 degrees F. Grease two round pans (normal round cake pans) and line the bottoms with parchment paper. The re-grease, and make sure to grease the sides as well! Make the coffee so it will be hot enough to melt chocolate. As coffee is brewing, chop up chocolate into chunks and then combine with the coffee. Stir well until melted, then set aside. In medium sized bowl, sift cocoa powder, flour, sugar, baking soda, and baking powder. Once all sifted, add salt to the mixture and set aside. In a VERY LARGE bowl with an electric mixer beat eggs until frothy and thickened. While still mixing on a medium speed add in (slowly) the oil, buttermilk, and vanilla. Finally add the coffee and melted chocolate and beat until all combined. Separate the batter among both pans and cook for 30 to 45 min. While cake is in oven start on frosting. Over a double boiler add the cream, sugar, and corn syrup over medium-low heat. Whisk together and let sit over heat for good five minutes while chopping up chocolate. Remove from heat and stir in chocolate until smooth and melted. The add the butter in chunks and stir until melted. Set frosting in refrigerator until cake comes out and is cooled completely. Add frosting on top of one cake and then stack the other on top. Cover the entire cake in frosting, and garnish with raspberries, and enjoy!

Saturday, November 28, 2009

Turkey Day Fave (Cranberry-Almond Spinach Salad)


Webster's definition of Thanksgiving: the act of giving thanks and expressing gratitude through prayer. My definition of Thanksgiving: a day to indulge in lots and lots of good American food. Thanksgiving is a day that one can eat as much as they please without being judged, so why not enjoy the food we eat? That is why this year I decided to prepare a salad that was sure to make a second round around the table.

Thanksgiving is the start of fall cooking, therefore cranberries are all the rage in many of the side dishes; including spinach salads. It was a must to add cranberries for it's a popular favorite among many traditional Americans, as well are warm and toasty slivered almonds. This salad pairs between sweet-tang which comes from fresh, squeezed orange juices spritzed within the dressing and dried up cranberries sprinkled through out the baby spinach.

Ingredients:  (makes for large families)
2 packages fresh baby spinach
1 cup crumbled feta cheese
1/4 small red onion, thinly sliced
1 cup dried cranberries
1/2 cup roasted or toasted almonds
1 cup balsamic vinaigrette salad dressing
4 tablespoons orange juice
LETS COOK!
pick off every single stem from each leaf of the baby spinach (yes, this is very tedious). Place spinach in a serving bowl and add the cheese, onion, and cranberries. Thinly slice almonds and add to bowl as well.
In separate bowl combine balsamic vinaigrette salad dressing and orange juice. mix well together and pour over salad mixture when ready to serve.
Toss entire mixture together, and try to leave most of the cheeses, onion slices, almonds, and cranberries on top of spinach.
Serve and enjoy. (very simple, yet very good!)

Friday, November 27, 2009

Classic Cranberry Apple Crisp


The classic cranberry apple crisp has been a whopping success twice; once at Ol' Dave's famous Montgomery fish fry (or shall we call it more of a "nursing home gathering"?) and once at the past Thanksgiving dinner with the many aunts, uncles, and grandparents. Blake and I first found the recipe in the good and trusted Houston Chronicle and flung the casual dessert together in no more than thirty minutes, which brought us great praise from our oh so flattering family and friends living Montgomery. We knew the recipe had been a keeper when the pan was licked clean and about twenty other desserts on the dessert table had gone untouched. If the dessert had passed the "this-beats-my-grandmother's-apple-pie-any-day test"  then for sure it would be good enough for the fam. Therefore, my grandma and I made it for Thanksgiving dinner, which turned out to be an even bigger hit when paired with home-made whipped cream.

My dad is a down-to-earth and true southern man loving anything "Betty Crocker" style home-made desserts. From pineapple upside down cake and pumpkin pie, to coconut cream pie and banana pudding. But he now has a new favorite that has climbed its way to his top 10 list of best desserts thanks to my new cranberry-apple crisp recipe. This recipe is great to make as a true southern dessert. It may not appear as decadent and chic as the tiramisu cake or english scones, but heck this is one that taste triumphs over appearance any day! However, my personal chef slash grandma gave me the grand idea of adding a pop of color and flavor by adding a dollop of fresh, home-made whipped cream on top. (Which really "topped" this crisp off!...hah!)

Ingredients: 
3 cups chopped unpeeled apples
2 cups fresh cranberries
1 1/4 cups sugar
1 1/2 cups uncooked quick-cooking oats (preferably maple sugar flavored) 
1/2 cup packed brown sugar
1/3 cup each: all-purpose flour and chopped pecans
1/2 cup melted margarine
whipped cream:
one small carton of whipping cream or heavy whipping cream
two to three tablespoons of granulated sugar 
LETS COOK!
for the crisp: 
Preheat oven to 350 degrees. Combine apples, cranberries and sugar in 2-quart rectangular pan. In a separate bowl, combine oats, brown sugar, flour, pecans and margarine. Top fruit mixture with oat mixture. Bake 45 min. or until bubbly and light brown. Serve with whipped topping
for the whipped cream:
pour all of the whipping cream into a medium sized bowl. Blend with an electric mixer for a LONG time! mix together until light and fluffy and no longer appears "liquidy". *but be very careful that it is not over mixed or it might start to form butter* once whipped, gently fold in sugar and stir well before serving. 

Tuesday, November 24, 2009

Beautiful Semi-Disaster (Chocolate-Raspberry Scone)


So where do i start? From sitting in seventh period tennis scrolling aimlessly through my phone thinking of ways to procrastinate my time from having to study for an unrealistic pre-calculus test the next day, or from going out to the Train concert the night before with Mr. Handsome as my mind floated from him, to the concert, to what my next blog post should be. Either way, I had decided it was time for me to kick it up a notch in my culinary skills. And what better way to do this than creating classic English scones? Yes, that is right an English scone made right here in my "Texanized" kitchen.

Before yesterday I had never tried, let alone encountered, such as a scone. But oh the stories i have heard about them! And the articles and pictures i have seen of them! There is such elegance about such a beautiful pastry-like bread. The unique shape with the glossy finish on top would make anyone look so fab and chic while eating this up-scale and high-end scone. If there was one food i would idolize over, this would be it. When I hear of a scone, I imagine a classic bakery on a small corner selling all varieties as the scents and aromas intertwine and mingle upon each other as they swirl their way through the bustling streets of fashionistas. So yes, as it shows I have great appreciation  for a little scone. Little did I know (tis tis.. I didn't do my research before I began to bake!) that scones do have a rather bland taste to them. However, I believe their appearance sure does make up for it.

The scone I have made has a basis of creamy dark chocolate and fresh raspberries. (Such a wonderful mix between the richness of the chocolate and the refreshing raspberries.) As i began making the scone dough while having a conversation with a close friend from Finland, I realized that anything is possible in the scone baking world! As I have added raspberries and chocolate to my scone, assorted nuts, berries, and heck! anything else could be added. My "Finish" friend even suggested putting a meat inside the scone, or adding cheese to the mixture! Scones are a time to express your personality and just to go and have fun with it! I decided to leave mine simpler, for this was my first experience at scone baking. Now I must warn thy fellow bakers; the recipe below for this raspberry and chocolate scone came out to be a bit bland and did not portray the thick flavors I had intended on. However, I did try part of my scone with some fresh raspberry jam and butter... and thought that topped the scone off making it splendid! Also coffee and tea will really bring out the hidden flavors of the scone giving it more taste than eating them alone. So this scone varies in taste with its endless possibilities on how to present and eat it.

You will need:
4cups all purpose flour
2/3 granulated  sugar
2 teaspoon baking powder
1 teaspoon baking soda
1/2 teaspoon salt
12 tablespoons butter, cold and cut into pieces
4.25 ounces dark chocolate chunks
2 cups fresh raspberries
1 cup whole milk plain yogurt (suprisingly this is hard to find!!!)
3 teaspoons pure vanilla extract
2 large egg, lightly beaten
Egg mixture for brushing tops of scones:
1 large egg, lightly beaten
1 tablespoon milk
LETS START COOKING!
preheat oven to 325 degrees F. Line a baking sheet with parchment paper.
In a large bowl, whisk together the flour, sugar, baking powder, baking soda and salt. Cut the butter into small pieces and blend into the flour mixture with a pastry blender or two knives. The mixture should appear crumb like. Stir in the chocolate chunks and whole raspberries. In a smaller bowl whisk together the yogurt, vanilla extract, and eggs. Add this mixture to the flour mixture and stir just until the dough comes together. *Do not over mix.!!*
Transfer to a lightly floured surface and knead the dough gently untill the dough better comes together and then pat, or roll, the dough into a circle that is about 7 inches (18 cm) round and about 11/2 inches (3.75 cm) thick. (For these processes you will most likely need to use lots more flour, for the dough can become very sticky) Cut the dough into four squares, and then cut each squart into 2 triangles. Place the scones on the baking sheet. Make an egg wash of one well-beaten egg mixed milk and brush the tops of the scones with this mixture.
Bake for about 15 minutes or until a toothpick inserted in the middle comes out clean. Remove from oven and then turn your broiler on. Sprinkle confectioners sugar over the tops of the scones and place them under the broiler. Broil for about a min. or less, until the sugar has melted and turns golden brown. Keep an eye out while scones are in the broiler, because they can burn! Transfer to a wire rack to cool.
Makes about 16 scones.

Sunday, November 22, 2009

Happy Birthday to me. . . (Tiramisu Cake)


Yes, I am known for arriving late for most occasions, and my birthday was no exception. As I walked through Russo's Italian Pizza Restaurant, I easily spotted my close friends and to no surprise saw that my requested margarita pizza had be eaten and none was left for the late birthday girl. Luckily, I had my lovely tiramisu cake to make up for the lost pizza thanks to a very trusted website of smittenkitchen.com. My birthday would not have been complete with out my birthday cake that I agonized over for weeks and searched multiple recipes and websites for at least a month until I came upon the absolute, perfect birthday cake that describes me almost a little too well.

Hands down, with nothing to think about, this was by far (or should I say by oceans far?) the best birthday cake that I have ever tasted and made before in my seventeen years of life. Smitten Kitchen gave me the basis for the cake, but I however, redesigned the cake from the inside out to add a little bit of me to the lovely masterpiece I like to call Tiramisu Birthday Cake. I might add that every one of my friends and family who were lucky enough to have a bite of the cake loved it as well, and eagerly dug in for seconds. (That is other than my good friend Jo-Jo who unfortunately is not a cake lover.) Lets just say I had none but the plate and seventeen candles left by the end of the night. . .

I made this a two layer cake, but hey! the more the layers the better the cake I say! Because this was my birthday, and I wanted top of the line ingredients for a top of the line cake. I used the trusted and delicious Ghirardelli chocolate bars. As the recipe originally called for a whipped icing, i had to spruce it up by adding chocolate ganache to the icing. (I have been known to be a bit of a chocolateholic.) I also added chocolate chips around the top of my cake for garnish along with grated chocolate to add a bit more bolder colors. (Yes, cheese graters work well for chocolate too!)


For the cake layers:
2 cups flour
2 teaspoons baking powder
1/8 teaspoon baking soda
1/4 teaspoon salt
1 1/4 sticks (10 tablespoons) unsalted butter, room temperature
1 cup sugar
3 large eggs
1 large egg yolk
1 1/2 teaspoons pure vanilla extract
3/4 cup buttermilk
For the espresso extract:
2 tablespoons instant espresso powder
2 tablespoons boiling water
*if it is hard to find instant espresso powder, just make some instant black coffee and use a little bit more
For the espresso syrup:
1/2 cup water
1/3 cup sugar
1 tablespoon Kahlua
For the filling and frosting:
1 8-ounce container mascarpone
1/2 cup confectioners’ sugar, sifted
1 1/2 teaspoons pure vanilla extract
1 tablespoon Kahlua
1 cup cold heavy cream
2 1/2 ounces bittersweet or semisweet chocolate, finely chopped, or about 1/2 cup store-bought mini chocolate chips
For the Frosting (if you would like to add more chocolate):
about 1/4 to 1/2 cup of whipping cream
a few blocks of chocolate (about 4 ounces or so)
LETS COOK!
Butter two 9×2 inch round cake pans, dust the insides with flour, tap out the excess, and line the bottoms of the pans with parchment or wax paper. Put the pans on a baking sheet.
Sift together the cake flour, baking powder, baking soda, and salt.
Working with  a hand mixer in a large bowl, beat the butter on medium speed until soft and creamy. Add the sugar and beat for another 3 minutes. Add the eggs one by one, and then the yolk, beating for 1 minute after each addition. Beat in the vanilla; don’t be concerned if the mixture looks curdled. Reduce the mixer speed to low and add the dry ingredients alternately with the buttermilk, adding the dry ingredients in 3 additions and the milk in 2 (begin and end with the dry ingredients); scrape down the sides of the bowl as needed and mix only until the ingredients disappear into the batter. Divide the batter evenly between the two pans and smooth the tops with a rubber spatula.
*REMEMBER: the more beating, the better*
Bake for 28 to 30 minutes, rotating the pans at the midway point. When fully baked, the cakes will be golden and springy to the touch and a thin knife inserted into the centers will come out clean. Transfer the cakes to a rack and cool for about 5 minutes, then run a knife around the sides of the cakes, unmold them, and peel off the paper liners. Invert and cool to room temperature right-side up.
*REMEMBER: always bake for less; it is much harder to fix a burnt cake than a not fully baked cake!*
To make the extract:
Stir the espresso powder and boiling water together in a small cup until blended. Set aside.
To make the syrup:
Stir the water and sugar together in a small saucepan and bring just to a boil. Pour the syrup into a small heatproof bowl and stir in 1 tablespoon of the espresso extract and the liqueur or brandy; set aside.
To make the filling and frosting:
Put the mascarpone, sugar, vanilla, and liqueur in a large bowl and whisk just until blended and smooth.
*for the frosting*: swirl in the chocolate ganache (but not until the VERY end)
Working with a hand mixer, whip the heavy cream until it holds firm peaks. Switch to a rubber spatula and stir about one quarter of the whipped cream into the mascarpone. Fold in the rest of the whipped cream with a light touch.
To assemble the cake:
Place one layer right-side up on a cardboard round or a cake plate protected with strips of wax or parchment paper. Using a pastry brush or a small spoon, soak the layer with about one third of the espresso syrup. Smooth some of the mascarpone cream over the layer – user about 1 1/4 cups – and gently press the chopped chocolate into the filling. Put the second cake layer on the counter and soak the top of it with half the remaining espresso syrup, then turn the layer over and position it, soaked side down, over the filling. Soak the top of the cake with the remaining syrup.

For the frosting, whisk 1 to 1 1/2 tablespoons of the remaining espresso extract into the remaining mascarpone filling. Taste the frosting as you go to decide how much extract you want to add. If the frosting looks as if it might be a little too soft to spread over the cake, press a piece of plastic wrap against its surface and refrigerate it for 15 minutes or so. Refrigerate the cake too.
With a long metal icing spatula, smooth the frosting around the sides of the cake and over the top. Garnish the top with chocolate chips and grated chocolate for bolder colors
Refrigerate the cake for at least 3 hours (or for up to 1 day) before serving – the elements need time to meld
. . . and this is my very first recipe on my very first blog. . .

Very first post!!

WOW! this is very new and very exciting to me as I write my very first post on my very first blog.  I have intentionally created this blog to share my cooking recipes and expiriences with the world, as well as mixing a bit of my life and my self into it. . .


So I would first off like to say that I wrote out beautifully written paragraphs about myself. Unfortunately computers do not always do as you please and the screen had passed out before I could simply press the save button. Therefore everything was lost and now I must attempt to remember my words that I have written...
This blog is coming from a suburban girl who is trapped inside a blistering cave known as Houston, Texas. Fortunately I have been able to travel the world to know that there actually is breathing and living life amongst the delicious and sophisticated cities such as the city of New York and all of their many coffee shops, the citrus scented markets of California, the restaurants filled of pasta and only more pasta in Rome, and the sweet, sweet, savory feelings when one bites into that oh so tempting sugary scone in a little cafe on the corner of Paris, France. So yes, I am aware that Houston feels quite small in comparison to these extravagant places that are well known for their food. Yet I am here to break through and be known as that girl from Texas who has such a strong passion for cooking.


Aside from cooking and baking, I also have a strong passion for art and music. My inspirations come from many unique museums (as well as battlefields, hah!). And for music, well I am an extreme concert junkie and have an intense passion towards music. As I am not an instrumental girl, I have recently decided to attempt to learn to read music notes, and that one day my fingers too will be able to move so gracefully over the dainty black and white keys that blend so well together to form a little something known as music.

Before i babble on more about myself i would simply like to say THANK YOU.
"My Blue Box Blog" was created by inspirations from other bloggers who so dearly love sugar, butter and kitchens. I want to genuinely say thank you to all the online cooks and bakers who have contributed and shared their very own recipes through the World Wide Web and blogging community. It is now my time to make a contribution back to the online networking community as I share my very own works through lots and lots of food and art.